Wednesday, November 30, 2011

Newspaper Beads

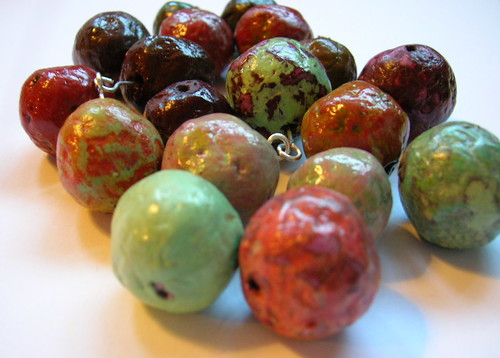
I found this tutorial maybe a year ago.  Basically, it's papier mache beads.  You take some newspaper, rip it into tiny pieces, then you pour boiling water over them to break it down.  Drain the water from the paper.  Use a clear drying glue (like Elmer's, they suggest) to form small balls.  Roll into balls, squeeze out excess moisture. Let them dry.  

Sand em, Drill em.  And then, my favorite part, paint em.  I like how she used multiple colors.  I think it gives it a nice look. Then varnish, let dry, and you're ready to create.  You should check out the tutorial.

Monday, November 28, 2011

Large Amigurumi Doll Tutorial

I found this free amigurumi doll pattern a while back and thought I'd share it.  It's a rather large doll.  I would say if you have one special little girl, this would be a great gift to make for her.  Not ideal for my situation at the moment.  It is Christmas time and I have about a dozen kids I need to make presents for.  Maybe for my one and only daughter, I could set aside the time for this dolly.  Of course, it's hard to hide the creation of something this big, but then again, she started kindergarten this year.  :)  Maybe it's possible after all.

http://stitch.hellooperator.net/free-patterns/amigurumi-doll/

Check out the tutorial.  Also, if you are going to make this for a child under three, sew on felt for eyes instead of buttons.  Happy crafting!

Sunday, November 27, 2011

Slippers from Sweater


I know I posted a while back about something similar, but i found this other diy tutorial on it.  This one is just hand sewing techniques.  It is very easy and would make a great  gift.

http://www.homemade-holiday-gifts.com/felted-slippers.html

You use an old wool sweater, make a template of your foot, cut out the pieces, blanket-stitch around, sew on the cuffs (making sure you pull it tight), and add buttons.  The slippers have also been felted.

The tutorial is very well written.  Check it out.

Saturday, November 26, 2011

It's been a while

I had a baby recently and haven't had much time to blog. Forgive me. I'm trying to get back. It is holiday season, as well. You know what that means... Presents! I don't have a lot of time, but I have even less money so this year will be a challenge. I will not be deterred, though.

Last year, I made all the kids a little doll. This year, I think I would like to continue the tradition. There are many kids in our family, and I can whip up an amigurumi friend in a few hours with the right planning. You can too. It's really quite easy.

Basic doll- one head, a sphere shape. one body, a cylinder shape. two arms and two legs, four thin cylinder shapes. make sure you leave a tail on all to sew. Last is just details. eyes, ears, mouth, nose, shoes, clothes. Easy accessories include- hats, purses, capes, masks, backpacks, etc.

Have fun! I'll post some pics of my crocheted friends soon. Until then, happy crocheting!

Friday, May 6, 2011

Crocheting and other Projects!

I haven't written for a while. Mostly because I got caught up in life. Our family has gone through a lot of changes within the last year. We lost a great man, but we will also be welcoming a new addition sometime between now and the end of July.

In other words, I have been forced back into creative mode. Because I'm going to be having another baby, I have been trying to make things that will be cute for our newest member.

So far, I have made a baby hat, with cute little bear ears. I always thought those hats were adorable, so I tried my hand at making one. I also made a small blanket that I plan on using as a carseat blanket. I still want to finish the baby booties I started.

The best part is that I already had all the materials for everything on hand. I used some baby blue yarn for the baby hat. The baby booties, I used some light green and blue fleece. I will also be using some yarn I already have to finish it. For the blanket, I found a large amount of royal blue yarn, so I decided that would make up the most of the blanket. Then I used two accent colors of yarn, one yellow, and one multi-color.

The blanket is pretty easy and quick to make. I just made a long chain of about 55 chains. I then went along that first row with half double crochets. Once at the end of that row, I chained three and then all along the next row (and every row after) I did the half double crochet in the back loop. By doing this you get an attractive texture to the whole blanket. It makes it look like the blanket is striped.

I made five rows of blue, then one row of yellow, then 5 more rows of blue, then one row of multi-color, and then I start back up with the pattern until I get to the desired size (something that'll fit on a car seat, after about three yellows, and ending with the five rows of blue).

I haven't finished it yet, but I think I'll probably go around the whole blanket with single crochets in the three colors used. When I'm done I'll post a picture.
Wednesday, October 13, 2010

Developing Some Wall Art

So, I have been making some printable, frame-able art. This one to the left is one of the first ones done. It is already up in my etsy store.

www.steenta.etsy.com

This one is obviously a Beatles quote. This quote is also probably my favorite quote, possibly of all time.

I got this idea because I make these little reminders for myself. I literally have a wall that I write on with positive thoughts. I thought I would share some of my favorites in a cute a fun way.

It is standard printer paper size, you can easily find a cheap frame at Wal-Mart or other big box store. Just look for a document frame or even just an 8 x 10 will work.

The files are sent as PDF's. Hope you enjoy.

Tuesday, October 12, 2010

Newspaper Purse

I made this newspaper purse a little while back, and I thought I would share it with the world. It is pretty simple to make.

Step one: Find a newspaper you can cut up. Either cut it into strips like the one shown or just use the whole page. I like the comics section but sometimes the other sections have cool pictures and just the words make a nice pattern, too.

Step two: Decide on your pattern, and what your going to use for the handle. This purse's handle is made from recycled shopping bags that were made into yarn then crocheted. Also decide if it's going to have a closure, or flap.

Step three: Weave strips if using this method.

Step four: Cover the inside both sides of the paper with clear packing tape.

Step five: Tape bag together. For the sides you can use two strips of leftover newspaper that you cover with tape and then tape it to the sides (inside and out) and tape it to the bottom of the bag. This will create a curved inside of the bag.

Step six: Add your flap or strap, sew your button, and add your handles.

Have fun, and I hope you enjoy your new purse!