Sunday, December 11, 2011

Earth Globe Plush

My inspiration from the etsy shop, Little Smiles Boutique


It's getting closer to Christmas and I am still working away, trying to get presents together.  Like you all know, my husband is still looking for a job, so we are low on money for gifts this year.  My time is also scarce with three kids, the youngest nearly five months old.  

While trying to come up with gift ideas, I looked over my children's Christmas lists, and saw that my daughter wants a globe.  Adorable.  She's in kindergarten, and I love that she is so interested in learning!  Anyhoo, at first I was going to buy a blow up globe ball.  They're under $10.  I also found a Earth Ball for about $15 at the Fat Brain Toys website.

I decided to save some money and just make a plushie of the Earth.  Here's what I did.  I got some blue yarn, and amigurumi crocheted two halves of a ball.

Pattern for Earth Ball

Make 2, using blue yarn...

magic ring, sc 6 times (6sc)
2sc in each sc (12 sc)
*1sc, 2sc in next sc* repeat around another 5x (18sc)
*2sc, 2sc in next sc* repeat around another 5x  (24sc)
*3sc, 2sc in next sc* repeat around another 5x (30sc)
*4sc, 2sc in next sc* repeat around another 5x (36sc)
*5sc, 2sc in next sc* repeat around another 5x (42sc)
*6sc, 2sc in next sc* repeat around another 5x (48sc)
*7sc, 2sc in next sc* repeat around another 5x (54sc)
*8sc, 2sc in next sc* repeat around another 5x (60sc)
sc around (60sc)
sc around (60sc)
sc around (60sc)
sc around (60 sc)
sc around (60 sc)

Now use blue yarn to sew the two  halves together leaving a couple inches to stuff it with stuffing.  After stuffing the ball, you have to add the continents.  You can use felt or fleece, whatever you have that doesn't fray.  You're also going to need some templates for the continents.  I used the templates from the site below.  You're gonna need to scale them down.  I also rounded some of the shapes, since there's no way I can create a perfect map of the world.  LOL. 


Feel free to use different colors for different continents.  I'm going to sew a little star on our location, so my daughter has an idea of where we live.  Hope you liked this tutorial.  You can do it.  Happy crafting!

Wednesday, December 7, 2011

Upcycled Tank Top Cape

I saw some cute kids capes on the internet and I thought I'd try it out myself.  My challenge was no money and no time to sew.  Here's what I came up with.  


I have been going through my clothes and getting stuff ready for goodwill, so I already had some shirts on hand.    They are all t-shirt material.  I cut them up the middle front if there was no design, but if I wanted to utilize a design, I just flipped the shirt and cut up the middle on the back.  It's very versatile.  I made sure to stop cutting before I got to the collar.  Then I cut in a diagonal line from the bottom up to the underarm.  Then I repeated this on the other side.  Finally, I tied the ends.

I plan on putting letters on the capes for each kid.  If you use a long sleeve shirt, you can easily add leg guards or arm guards for the costume.  Also if the shirt is a button up, you can utilize that.  I also used some short sleeve stretch t-shirt sleeves for masks.  I just cut out eye holes.  No need to sew, but if you want it'll look more finished.  This is easy to make, personalize, customize, and embellish.  Best thing, it costs nothing but a little time.

Friday, December 2, 2011

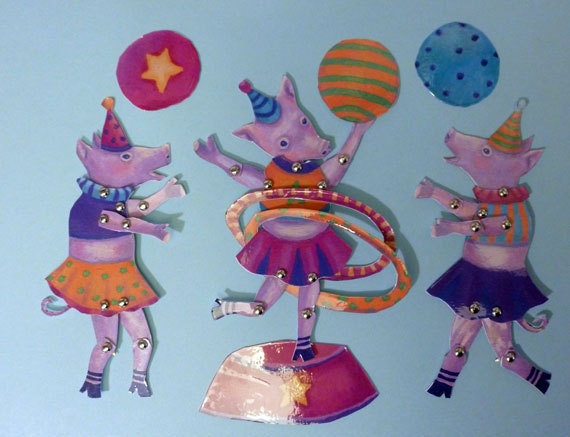
Paper Puppets for Kids or Just for Fun

So I had this idea.  I wanted to make a personalized puppet for each of the kids.  I started looking up the different types of puppets out there, keeping in mind it needs to be simple, cheap, and kid-friendly.  

This one would be awesome to make for an ornament.

I found a few different options.  One being a paper puppet.  Do not get this confused with the paper bag puppet.  The one I'm talking about is a puppet, usually made out of paper, that the legs and arms are cut out and attached so they can move.  Here's a picture of the legs for a Day of the Dead skeleton paper puppet.

Not very Christmasy, but still it's good to explain how it works.  http://www.inside-mexico.com/titere.htm

These are actually for sale for $22.  They're so cute.  The shop is called ArtistinLaLaLand on www.etsy.com

I think I may use some cardboard to make some of these little paper puppets.  I have a few cereal boxes I can cut up and they will do nicely.  Then I will cut out my pieces and paint them white, so I have a blank canvas.  Then I'll paint them up and attach them with brads.  I'll make a few accessories, and voila.

A fun and easy present for my lil kiddies and their cousins.  I think I'll need to come up with a theme.  Something fun like the circus theme that ArtistinLaLaLand used.  I'll post pics when I have something together.  Happy Puppet-Making!  LOL

Thursday, December 1, 2011

Art Dolls by Papillon Bleu UK

If you like interesting and unique dolls, you'll appreciate this!

I found this blog today.  It's really cool.  She makes these beautiful art dolls.  Check it out.
http://papillonbleuuk.blogspot.com/

Wednesday, November 30, 2011

Newspaper Beads

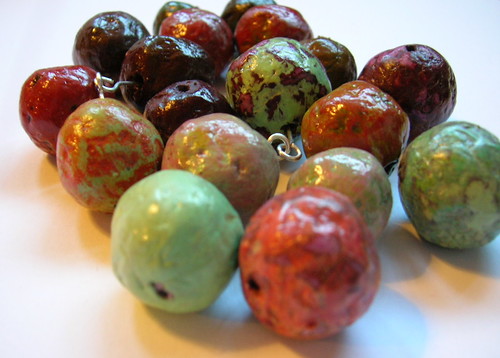
I found this tutorial maybe a year ago.  Basically, it's papier mache beads.  You take some newspaper, rip it into tiny pieces, then you pour boiling water over them to break it down.  Drain the water from the paper.  Use a clear drying glue (like Elmer's, they suggest) to form small balls.  Roll into balls, squeeze out excess moisture. Let them dry.  

Sand em, Drill em.  And then, my favorite part, paint em.  I like how she used multiple colors.  I think it gives it a nice look. Then varnish, let dry, and you're ready to create.  You should check out the tutorial.

Monday, November 28, 2011

Large Amigurumi Doll Tutorial

I found this free amigurumi doll pattern a while back and thought I'd share it.  It's a rather large doll.  I would say if you have one special little girl, this would be a great gift to make for her.  Not ideal for my situation at the moment.  It is Christmas time and I have about a dozen kids I need to make presents for.  Maybe for my one and only daughter, I could set aside the time for this dolly.  Of course, it's hard to hide the creation of something this big, but then again, she started kindergarten this year.  :)  Maybe it's possible after all.

http://stitch.hellooperator.net/free-patterns/amigurumi-doll/

Check out the tutorial.  Also, if you are going to make this for a child under three, sew on felt for eyes instead of buttons.  Happy crafting!

Sunday, November 27, 2011

Slippers from Sweater


I know I posted a while back about something similar, but i found this other diy tutorial on it.  This one is just hand sewing techniques.  It is very easy and would make a great  gift.

http://www.homemade-holiday-gifts.com/felted-slippers.html

You use an old wool sweater, make a template of your foot, cut out the pieces, blanket-stitch around, sew on the cuffs (making sure you pull it tight), and add buttons.  The slippers have also been felted.

The tutorial is very well written.  Check it out.

Saturday, November 26, 2011

It's been a while

I had a baby recently and haven't had much time to blog. Forgive me. I'm trying to get back. It is holiday season, as well. You know what that means... Presents! I don't have a lot of time, but I have even less money so this year will be a challenge. I will not be deterred, though.

Last year, I made all the kids a little doll. This year, I think I would like to continue the tradition. There are many kids in our family, and I can whip up an amigurumi friend in a few hours with the right planning. You can too. It's really quite easy.

Basic doll- one head, a sphere shape. one body, a cylinder shape. two arms and two legs, four thin cylinder shapes. make sure you leave a tail on all to sew. Last is just details. eyes, ears, mouth, nose, shoes, clothes. Easy accessories include- hats, purses, capes, masks, backpacks, etc.

Have fun! I'll post some pics of my crocheted friends soon. Until then, happy crocheting!

Friday, May 6, 2011

Crocheting and other Projects!

I haven't written for a while. Mostly because I got caught up in life. Our family has gone through a lot of changes within the last year. We lost a great man, but we will also be welcoming a new addition sometime between now and the end of July.

In other words, I have been forced back into creative mode. Because I'm going to be having another baby, I have been trying to make things that will be cute for our newest member.

So far, I have made a baby hat, with cute little bear ears. I always thought those hats were adorable, so I tried my hand at making one. I also made a small blanket that I plan on using as a carseat blanket. I still want to finish the baby booties I started.

The best part is that I already had all the materials for everything on hand. I used some baby blue yarn for the baby hat. The baby booties, I used some light green and blue fleece. I will also be using some yarn I already have to finish it. For the blanket, I found a large amount of royal blue yarn, so I decided that would make up the most of the blanket. Then I used two accent colors of yarn, one yellow, and one multi-color.

The blanket is pretty easy and quick to make. I just made a long chain of about 55 chains. I then went along that first row with half double crochets. Once at the end of that row, I chained three and then all along the next row (and every row after) I did the half double crochet in the back loop. By doing this you get an attractive texture to the whole blanket. It makes it look like the blanket is striped.

I made five rows of blue, then one row of yellow, then 5 more rows of blue, then one row of multi-color, and then I start back up with the pattern until I get to the desired size (something that'll fit on a car seat, after about three yellows, and ending with the five rows of blue).

I haven't finished it yet, but I think I'll probably go around the whole blanket with single crochets in the three colors used. When I'm done I'll post a picture.